Guide
The Agentic Researcher
Most of my research projects run the same loop: write some software, analyse the data it produces, write the paper, then go round again when the results raise a new question. AI agents now help with every part of that loop, and they work best on a computer set up for them.
This guide explains why I think that computer should run Linux, why Omarchy is a good way in, and then walks you through setting it up from scratch: installing Omarchy, installing my research setup, and taking one small project from code to paper. It assumes no Linux experience. Every step has a screenshot, and the numbers on each screenshot match the notes beneath it.
Why Linux, now
For most of the last thirty years the operating system barely mattered to research. You needed Word, a statistics package and a reference manager, and they ran on whatever you had. Agents change that, because of how they work.
An AI agent such as Claude Code doesn’t click through menus. It reads files, runs commands and writes files, in a terminal, the same way a programmer does. Give it a computer where everything is a file and every action is a command, and it can do far more for you. That describes Linux.
On Linux, your code, data, paper and even your computer’s settings are plain text files and commands. An agent can read and change all of them, so it can help with the whole project and fix the computer when something breaks.
Papers written in Quarto or Typst are plain text, like the code. When an agent edits your paper you see exactly which words changed, line by line, and you can accept or undo each change. A Word document doesn’t give you that.
The software, the analysis and the paper sit in one folder under version control. Anyone, including you in two years, can rebuild every figure and number from the raw data with one command.
University computing clusters and cloud servers run Linux. What you learn on your laptop carries straight over when your analysis outgrows it.
The tools here run on your own machine: notebooks, databases, the grammar checker. Only what you send to the agent leaves it, and you decide what that is.
No licences, no subscriptions for the operating system or the research tools, and nothing changes unless you change it.
The honest costs. Linux asks you to learn new habits, and some things are harder: Microsoft Office runs only in the browser, some university software is Windows-only, and a few laptops have hardware Linux doesn’t fully support. The agent softens the learning curve a great deal, because you can ask it to explain or fix anything you meet. If you rely on Windows-only software, Omarchy can sit beside Windows on the same computer (see step 3).
Why Omarchy, for this moment
Omarchy is a Linux distribution made by David Heinemeier Hansson at 37signals, the company behind Basecamp. It takes Arch Linux and the Hyprland desktop and makes every decision for you, with good taste, so the computer is ready to work on the day you install it. Its own tagline is the malleable OS for the age of agents, and three things make it a good fit for researchers right now.
- The agents are already there. Claude Code, Codex, GitHub Copilot and a dozen other coding agents come ready to run. On first boot Omarchy asks which one you want as your default, and when an app crashes you can click the notification to send your agent to investigate.
- Everything is meant to be changed, by you or your agent. Every setting is a plain text file, and Omarchy ships skills that teach your agent how to work with it, from changing a setting to building a theme or an app. The setup in this guide was built that way: I described what I wanted, and Claude Code wrote the configuration.
- It’s fast to try and fast to undo. The installer asks five questions and finishes in minutes. Because the whole setup is files and scripts, you can rebuild it on a new computer in an afternoon.
We’re in a transition. Agents can now do much of the mechanical work of research, but most researchers still work in tools designed before agents existed. Omarchy is one of the first desktops designed with agents in mind, and it’s a comfortable place to learn how to work alongside one.
Omarchy is keyboard-first, which can feel strange at first. My setup adds a mouse-friendly layer on top: a file list you can click, a right-click menu in the editor, and a Projects menu. You need about six shortcuts to start, and they’re all in the cheat sheet.
Install Omarchy
Back up first. A normal Omarchy install erases the whole drive you install it on. Copy anything you want to keep somewhere else first. To keep Windows alongside Omarchy instead, follow Omarchy’s dual-boot guide.
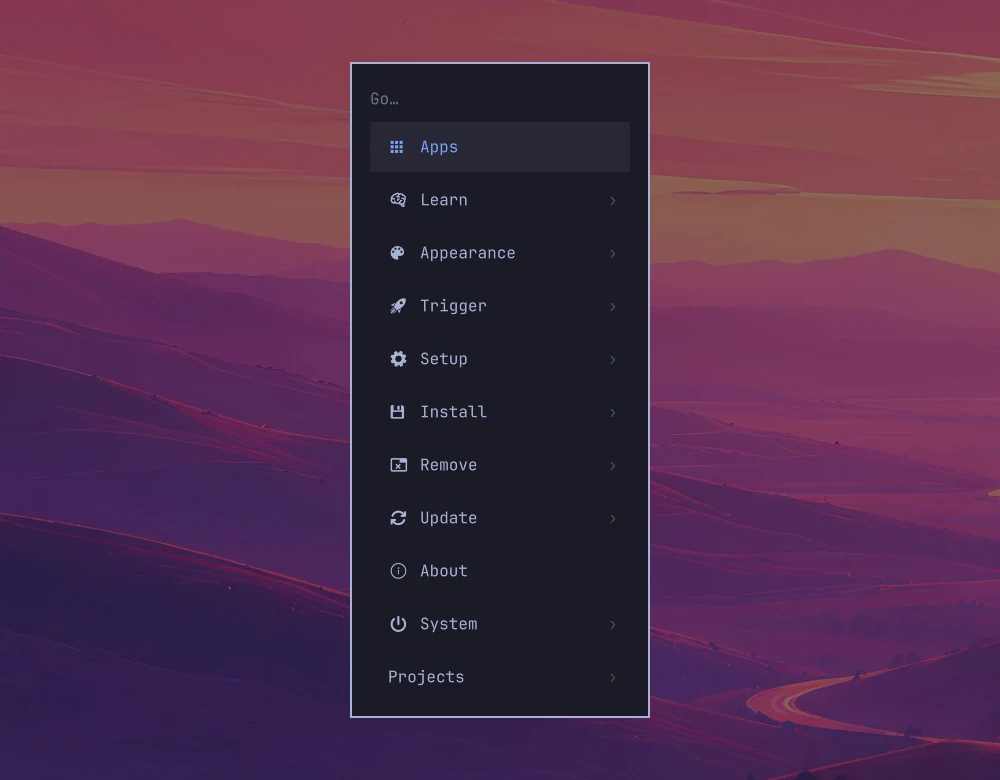
Omarchy starts on an empty desktop. Almost everything starts from one menu.
 123
- Type to search. Start typing any word, such as wifi or theme, to find a setting without hunting through the menus.
- Setup holds the everyday settings: displays, keyboard, language, network, and which AI agent is your default.
- Projects appears after you install the research setup in the next step. It’s where every project starts.
Install the research setup
My setup is on GitHub at thomasbierly/agentic-research. It adds what Omarchy doesn’t have for research: Quarto and Typst for papers, Zotero for references, Python notebooks, a Projects menu, and editor features for writing.
Open a terminal with Super + Enter and type these two lines, pressing Enter after each:
git clone https://github.com/thomasbierly/agentic-research ~/.local/share/agentic-research
~/.local/share/agentic-research/install.sh
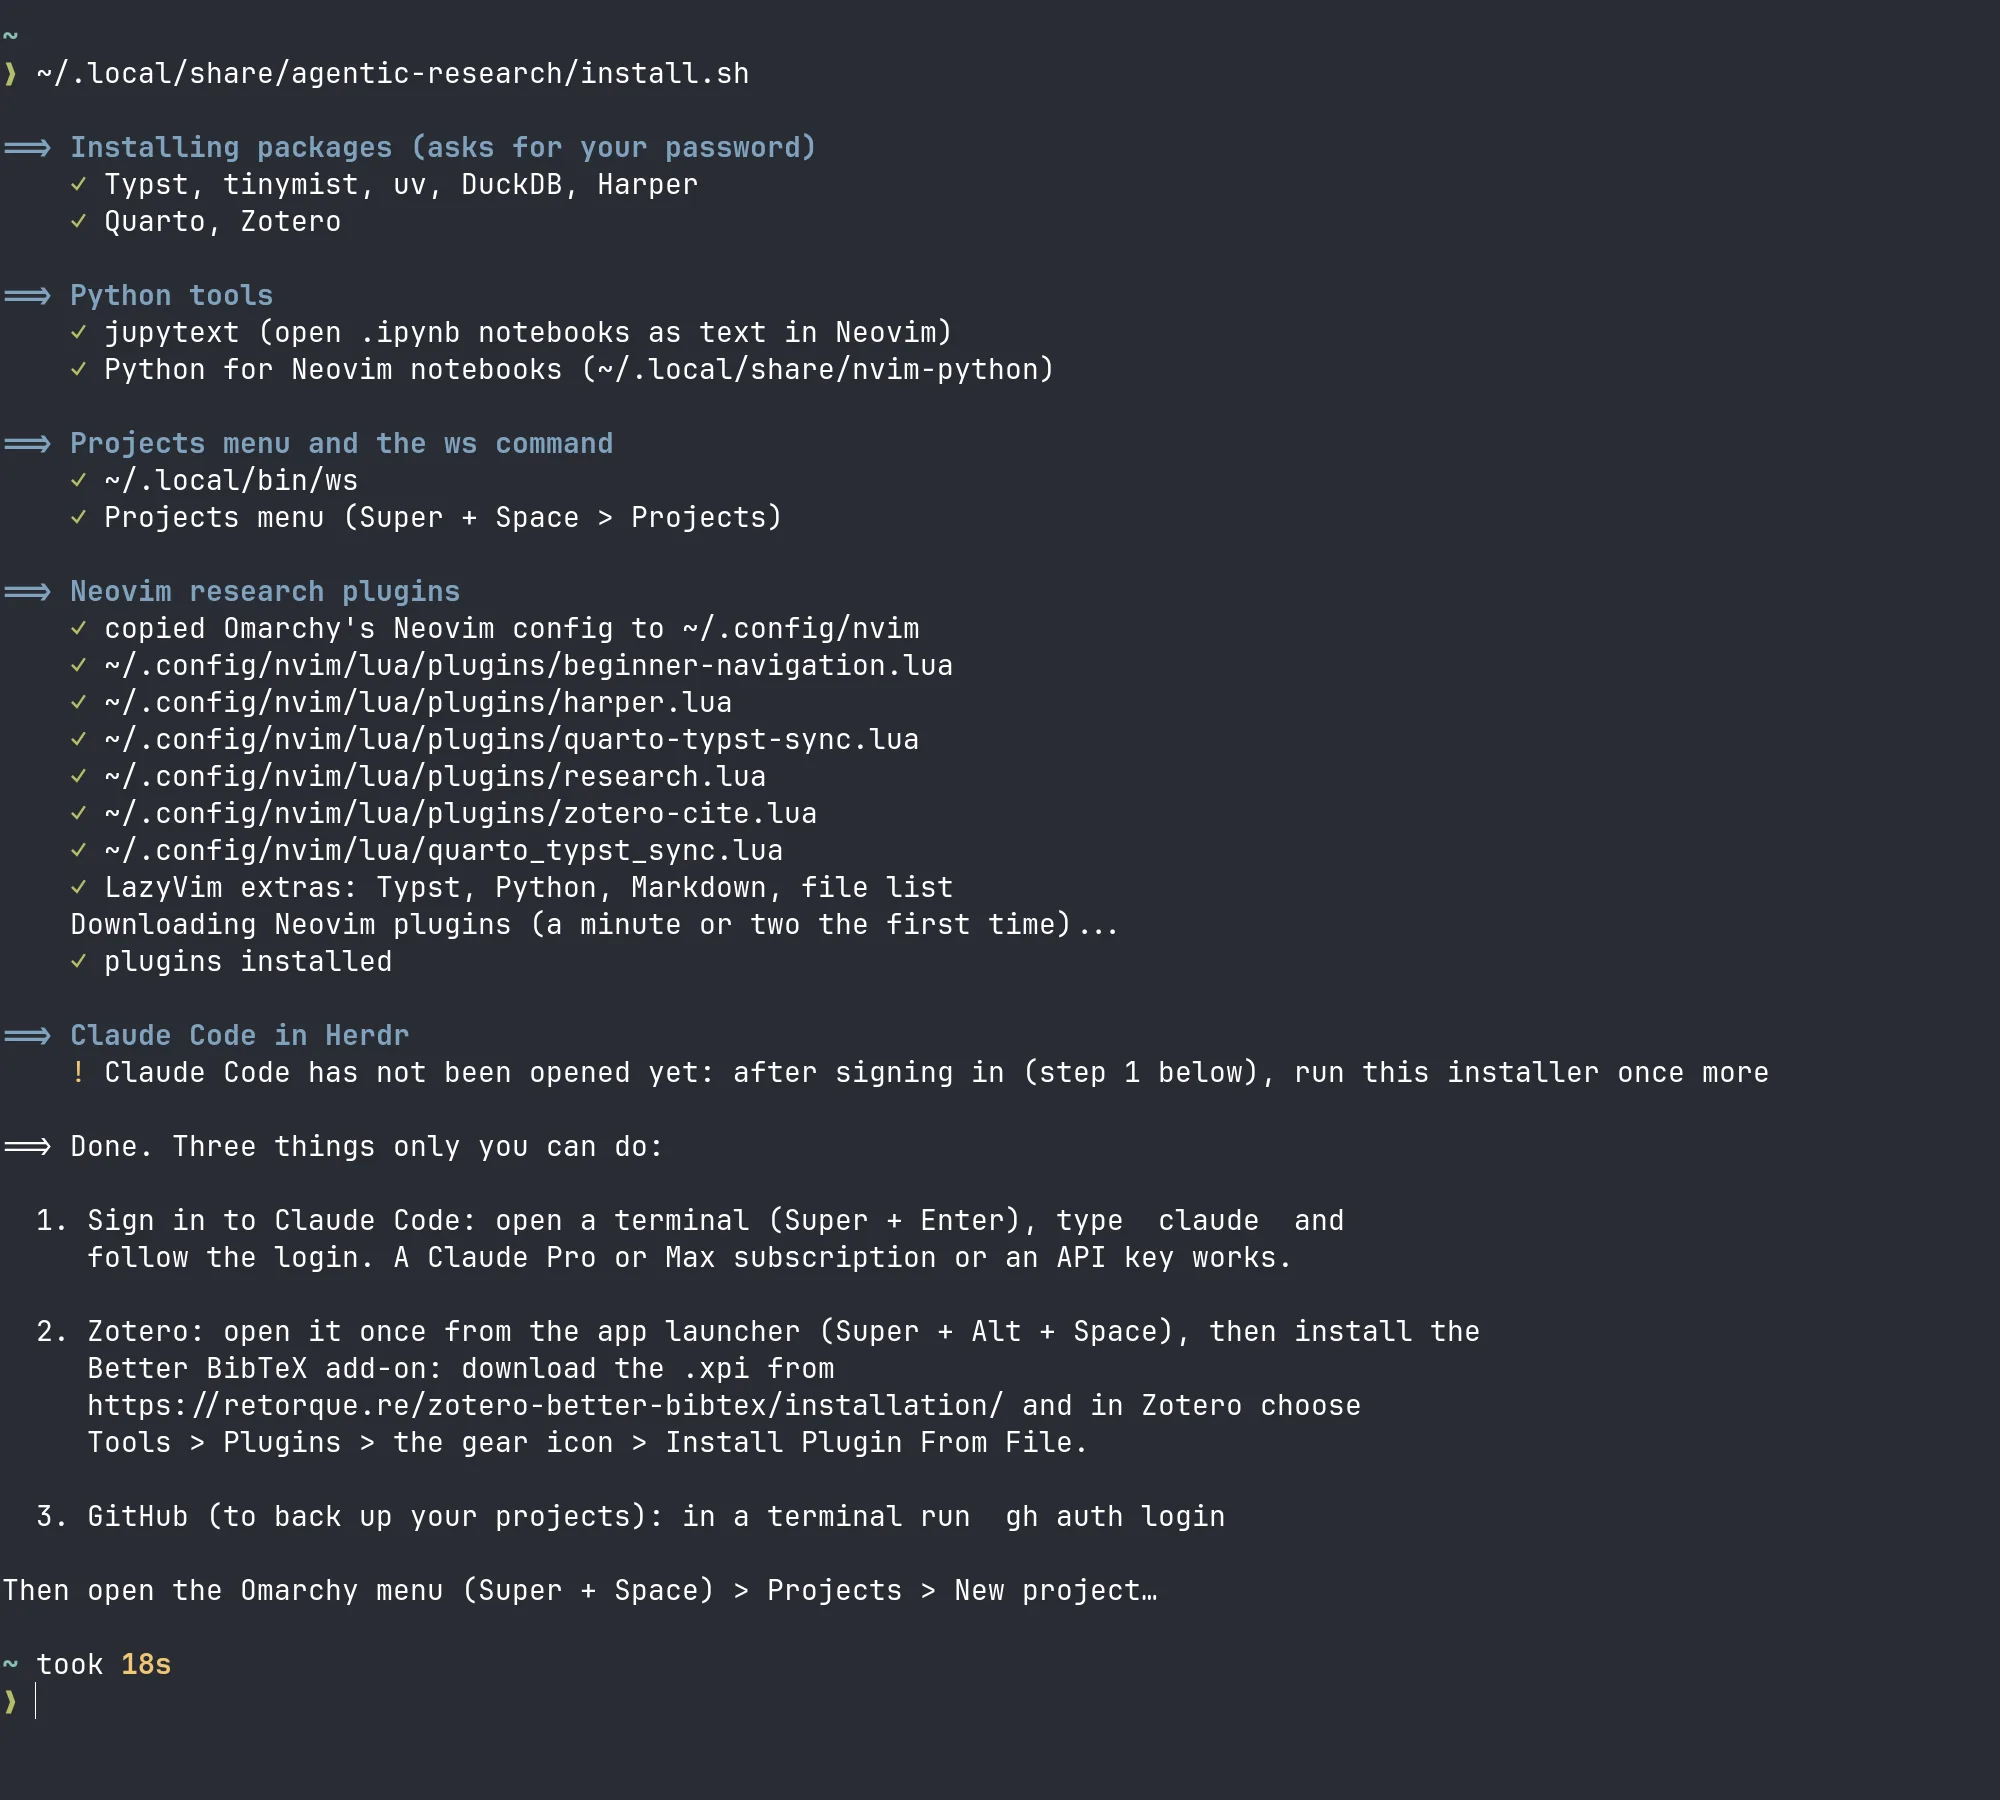
It asks for your password once, to install software, then works through each part and ticks it off.
 1234
- The command you typed.
- Each part ticks off as it’s done. If one shows ! instead, the message says what to do; it’s always safe to run the installer again.
- This one is expected on a new computer: Claude Code hasn’t been opened yet. Sign in (below), then run the installer once more.
- The three things only you can do, explained below.
When it finishes it lists three things only you can do:
- Sign in to Claude Code. In the terminal, type
claude, press Enter and follow the sign-in. You need a Claude subscription (Pro or Max) or an Anthropic API account. Then run the installer line again, so the project workspace can show you when Claude needs you. - Add Better BibTeX to Zotero. Open Zotero from the app launcher (Super + Alt + Space). Download the
.xpifile from the Better BibTeX site, then in Zotero choose Tools › Plugins, click the gear icon and choose Install Plugin From File. - Connect GitHub, so your projects are backed up. In the terminal type
gh auth loginand follow the questions.
To update the setup later, run the installer line again.
Your first project
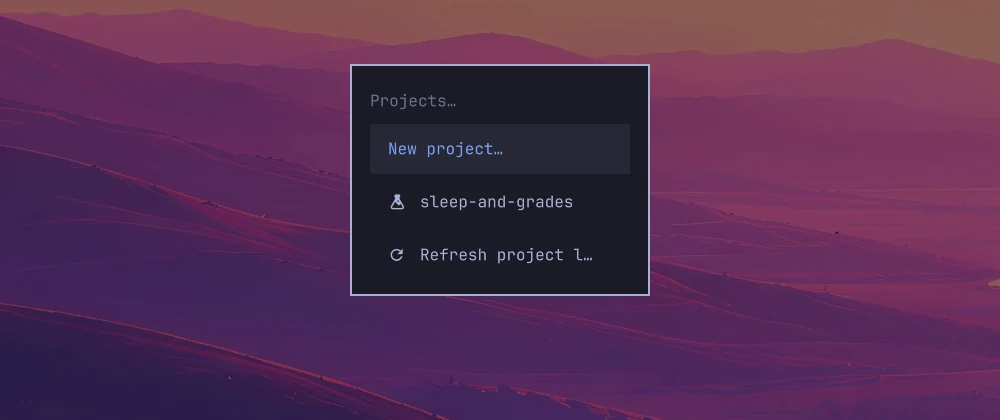
Every project lives in its own folder in ~/Projects and opens in its own workspace. To start one, open the Omarchy menu with Super + Space and choose Projects.
 123
- New project… creates a project and opens it.
- Your projects, one per line. Click one to open it, or to come back to it later.
- Refresh project list picks up a project folder you copied into
~/Projectsyourself, for example one cloned from GitHub.
 1
- Type a short name and press Enter. Letters, numbers and dashes work best; spaces become dashes. Press Esc to cancel.
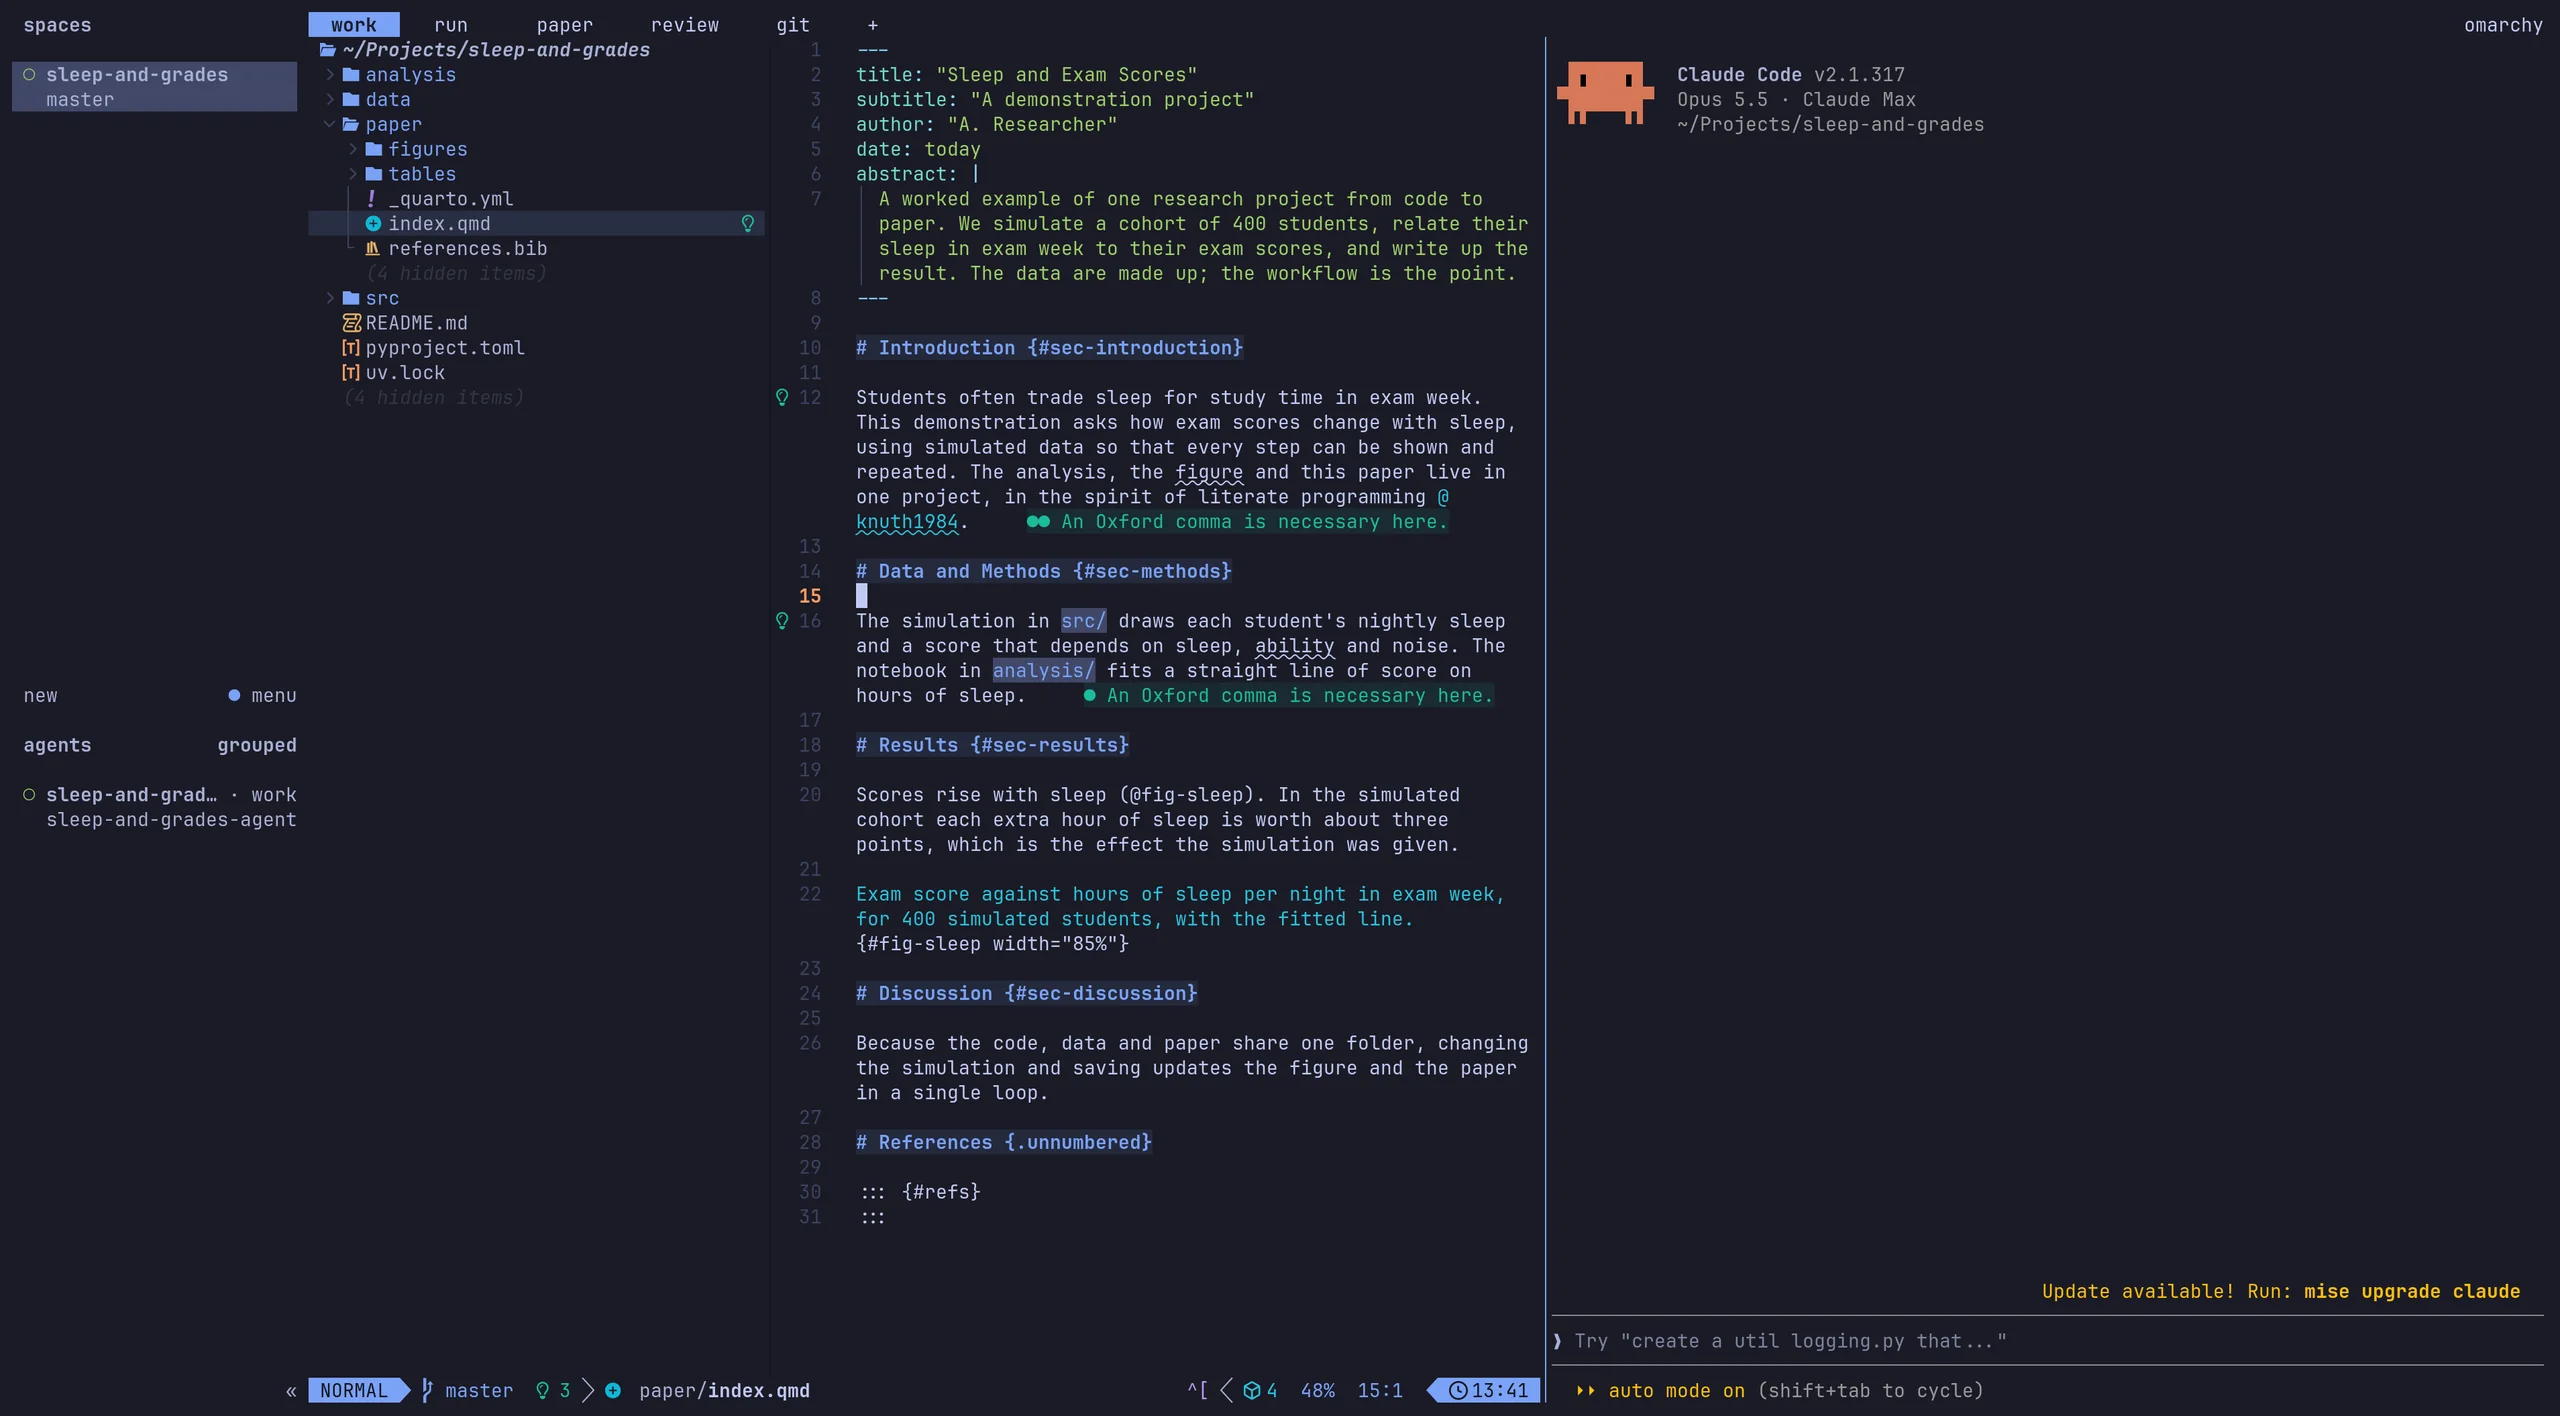
The project opens in a workspace with five tabs, one for each kind of work. You switch between them by clicking the tab names or with Alt + 1 to 5.
 1234567
- The five tabs: work, run, paper, review and git. Click one, or press Alt + 1 to 5.
- The file list. Click a folder to open it and a file to edit it.
- The editor, showing the paper. Press i to start typing and Esc when you’re done; long paragraphs wrap to fit.
- Writing suggestions appear in green after a line, here a suggested comma. They come from a checker that runs on your computer.
- Claude Code, your agent, already working inside this project.
- Type your request here and press Enter.
- Projects and agents. The dot next to an agent shows whether it’s working, waiting for you or done, so you can leave it to work and check back.
The folder has one place for each stage of the project:
| Folder | What goes in it |
|---|---|
src/ | The software: a simulation, a data collector, a model. |
data/ | Raw data, and data your software produces. |
analysis/ | Notebooks that turn data into tables and figures. |
paper/ | The paper, written in Quarto. Figures land in paper/figures/ straight from the analysis. |
The research loop
The rest of this guide follows one small, made-up study, sleep-and-grades, round the loop: does sleep in exam week change exam scores? Each stage has its own tab, and the agent can help at every one.
6.1 Write the software, with the agent
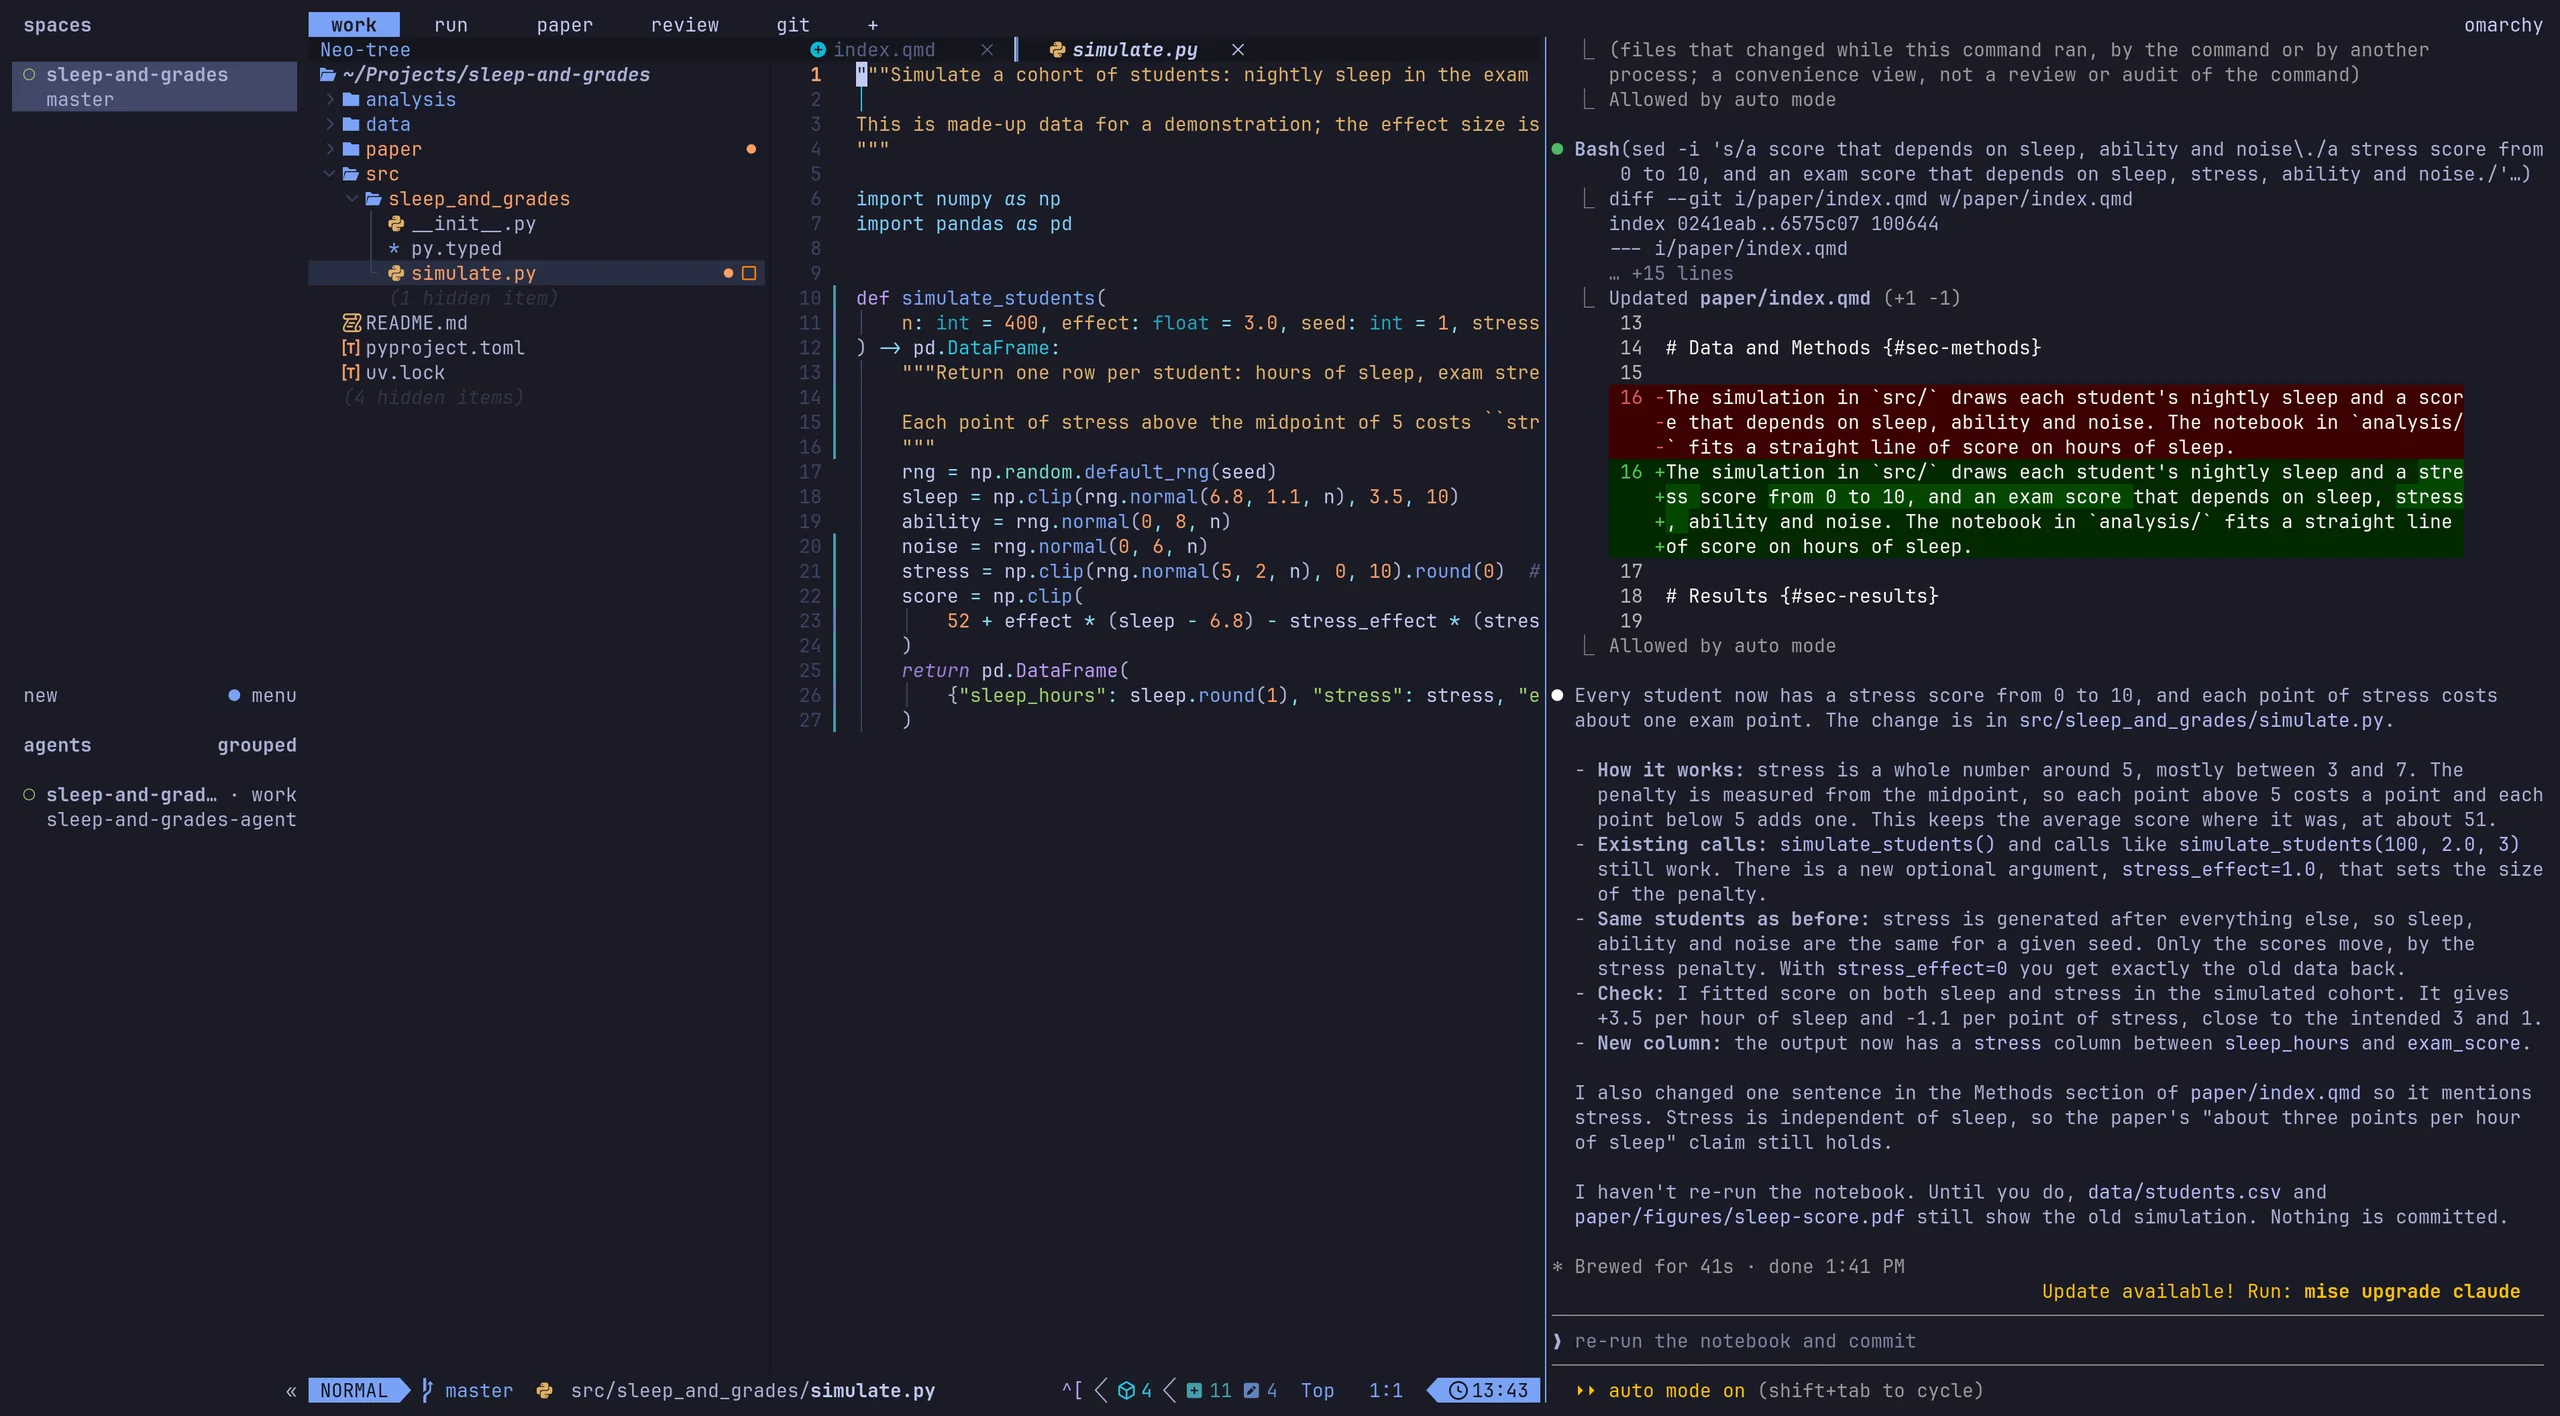
Claude Code sits beside the editor in the work tab. Tell it what you want in plain English. It reads the project, proposes changes and asks before it does anything you haven’t allowed. Here I asked it to add a second factor to the simulation.
 12345
- Claude shows each edit as it makes it: red lines removed, green lines added. Here it also updated a sentence in the paper so the Methods section matches the code.
- Its summary: what it changed, how it checked the result, and what it hasn’t done yet (re-run the notebook).
- The changed file is open in the editor. The coloured bar in the margin marks changed lines.
- Changed files are marked in the file list.
- Reply here to ask for changes or the next step.
To open any file yourself, click it in the file list on the left. Right-click in the text for a menu of everyday actions: find a file, search the whole project, show the PDF, show or hide the file list.
6.2 Run it and look at the data
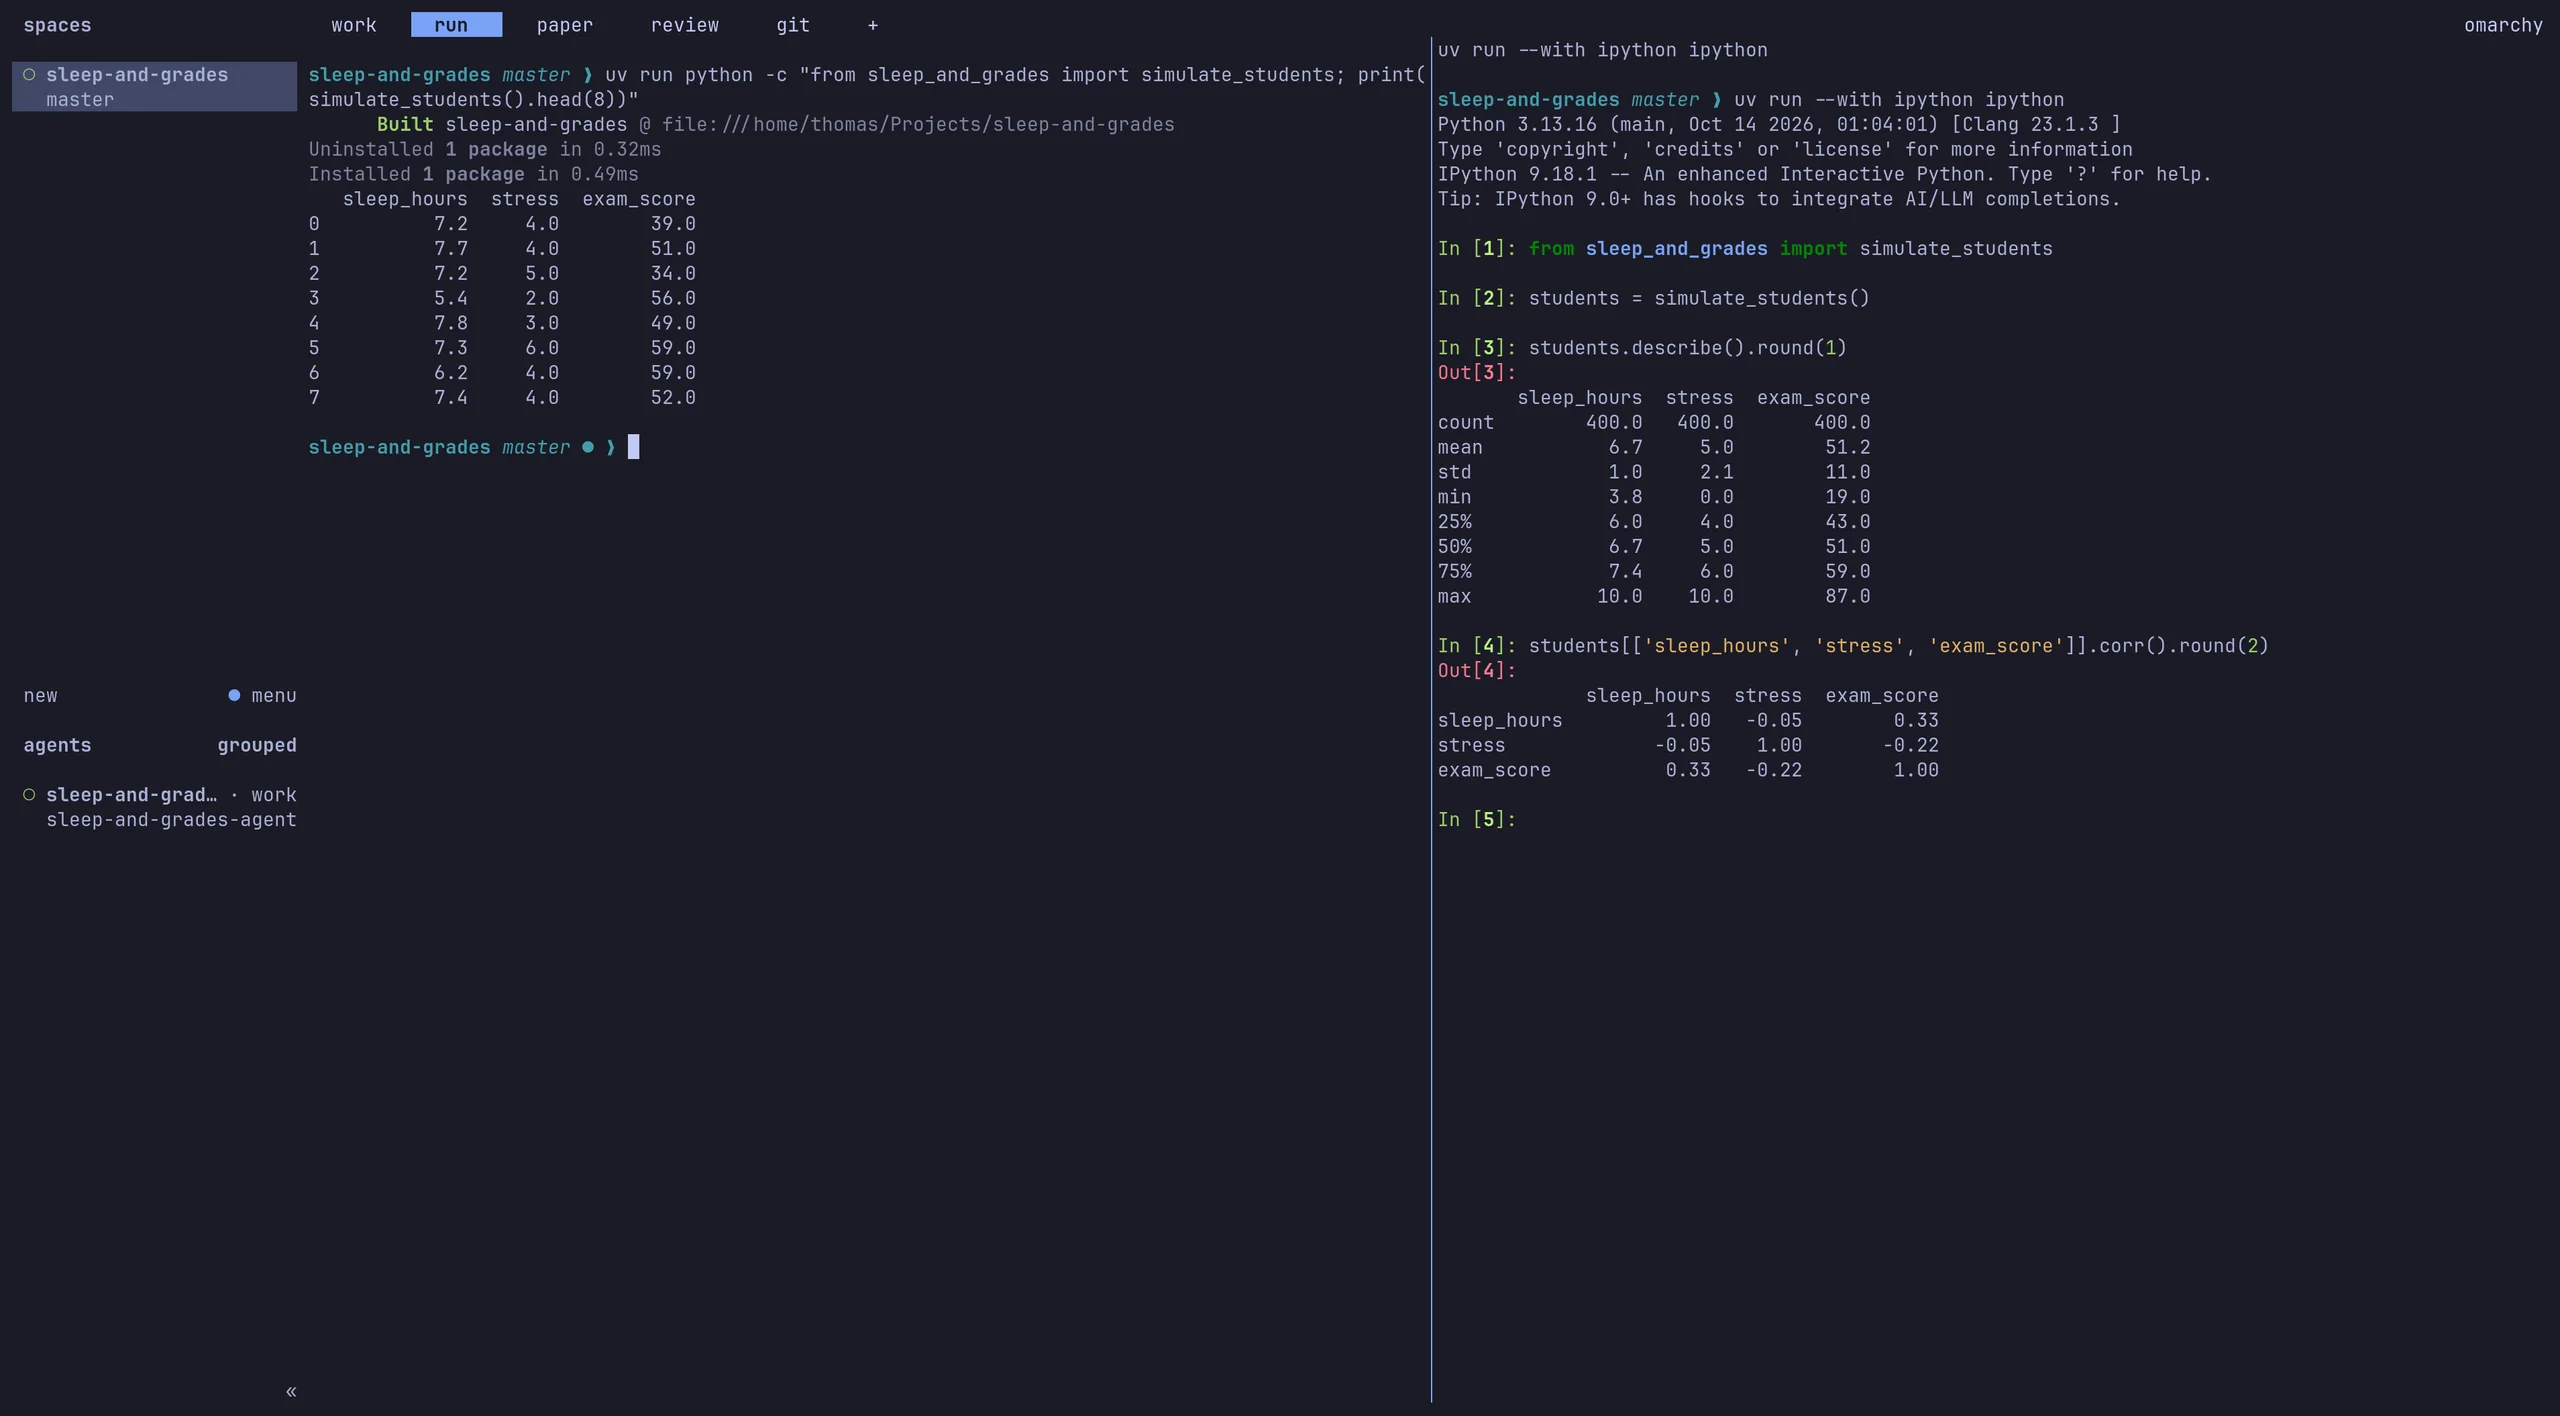
The run tab has a plain terminal on the left for running your software, and a Python console on the right that already knows about your project, so you can load the data and poke at it.
 1234
- The run tab.
- A terminal for running your software. Here it prints the first eight simulated students, including the new
stresscolumn. - A Python console (IPython) that can import your project’s code. Type a line, press Enter, see the result.
- Quick checks before any formal analysis: here, how sleep, stress and score move together.
6.3 Analyse in a notebook
Analysis lives in Quarto notebooks in analysis/: text and Python code in one file. The starter notebook simulates the cohort, fits a line, and saves the figure straight into paper/figures/, so the paper always shows the latest result. To run a whole notebook, type this in the run tab’s terminal:
uv run quarto render analysis/01-explore.qmd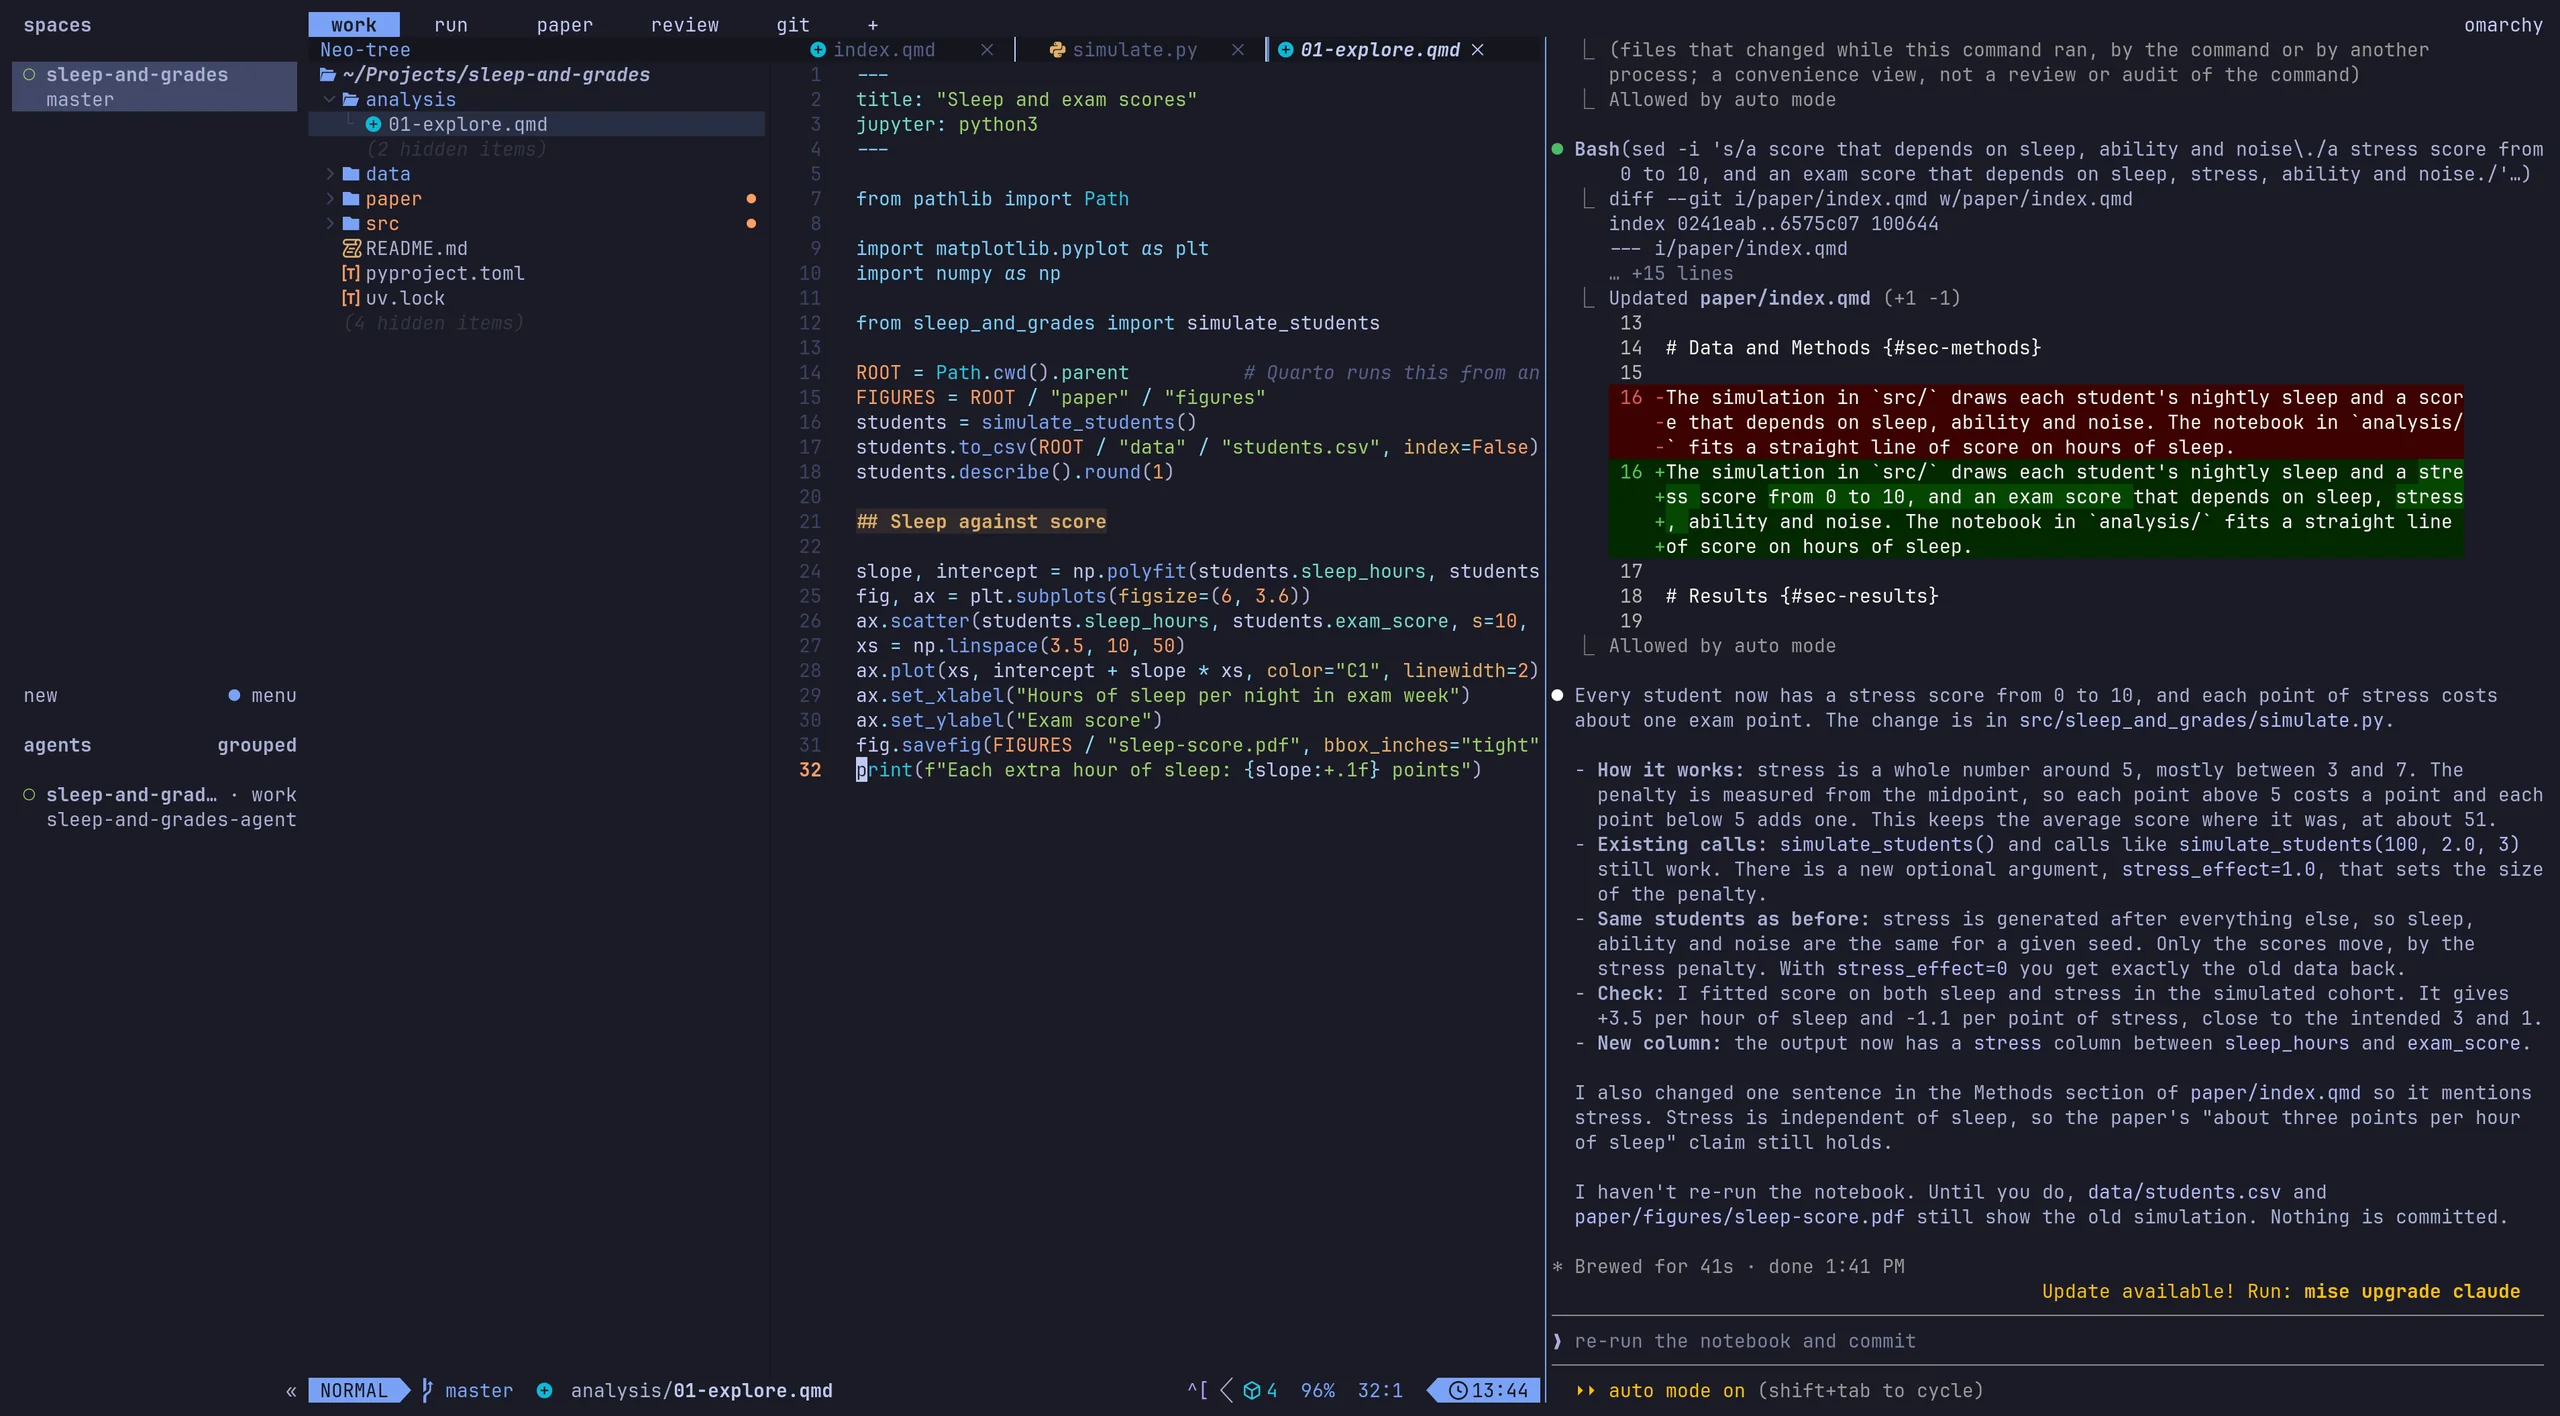 1234
- Notebooks live in
analysis/. - Setup code: it loads the project’s simulation and saves the data to
data/. - Headings and text between the code explain the analysis, like a lab notebook.
- This line saves the figure straight into
paper/figures/, so the paper always shows the latest version.
analysis/ · click the screenshot to enlarge6.4 Write the paper, with a live PDF
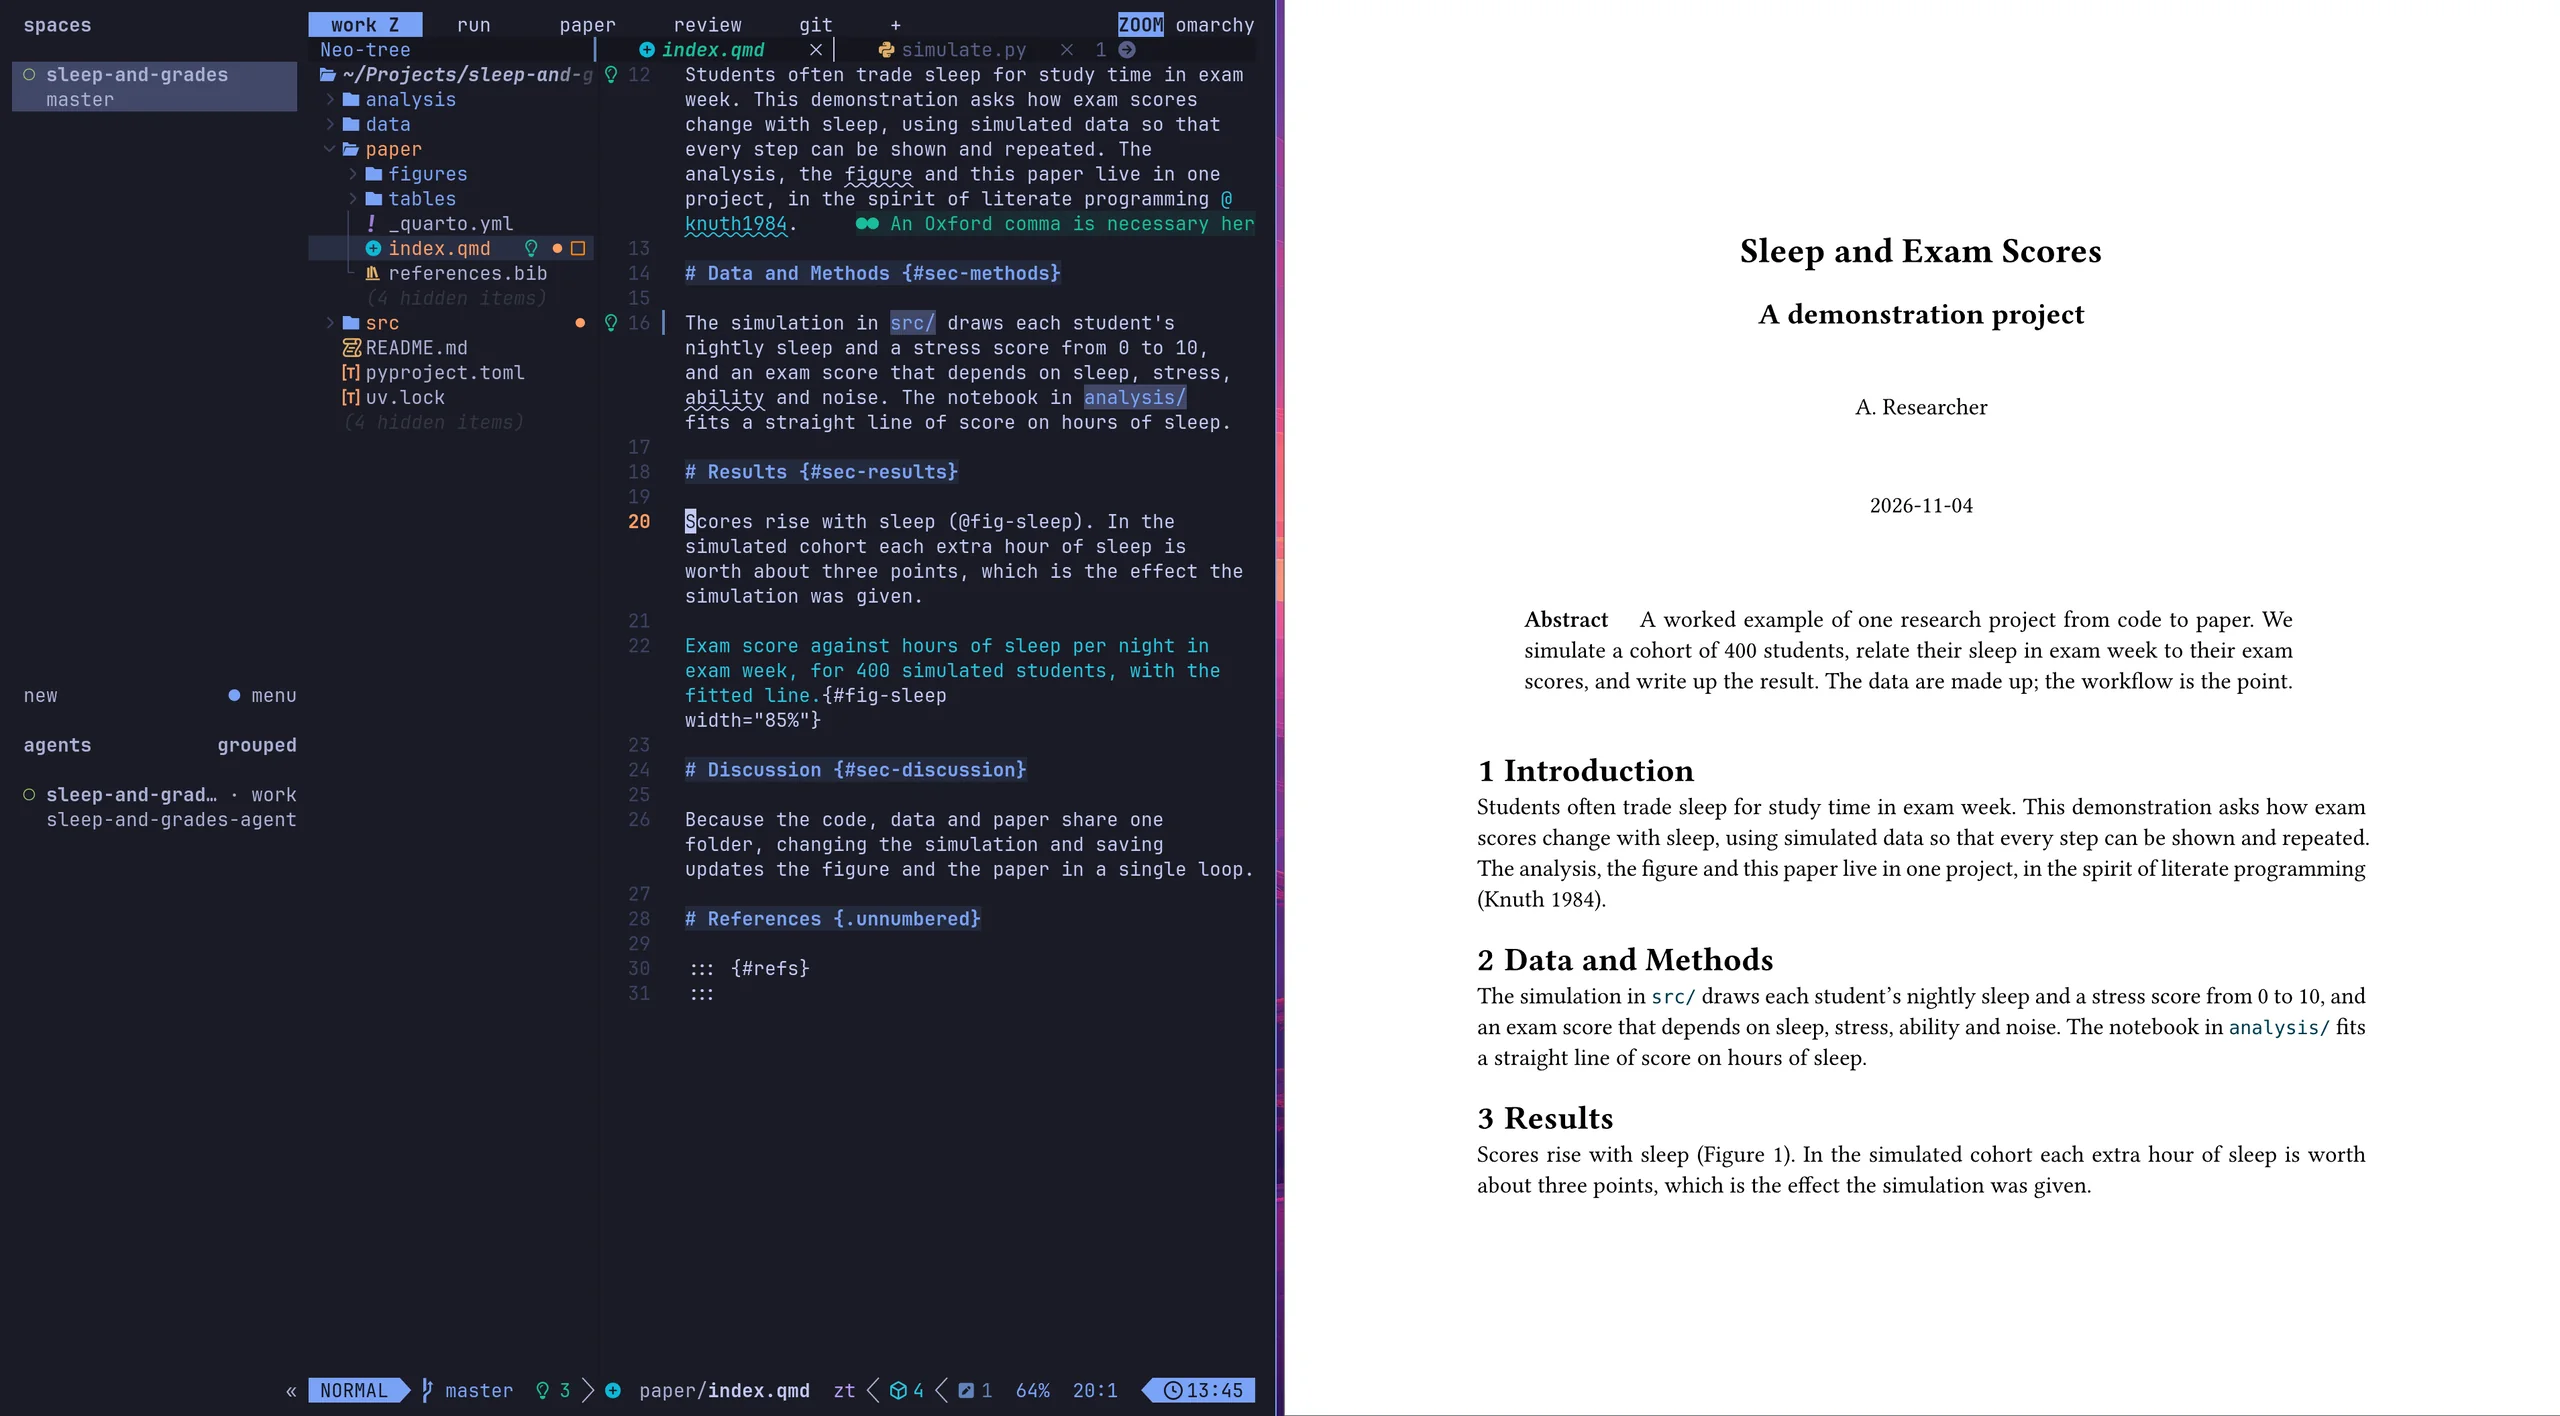
The paper is paper/index.qmd, written in Markdown: plain text with a few marks for headings, emphasis and citations. The paper tab rebuilds the PDF every time you save. To see it, right-click in the text and choose Show PDF preview. The PDF opens in a window beside the editor, and clicking any sentence in it takes the editor to that sentence.
 1234
- The source of the Results section in
paper/index.qmd. - The same paragraph in the PDF. Click any sentence here and the editor jumps to it.
- The preview opens in its own window and updates a few seconds after you save.
- The agent’s change to the Methods section, already in the PDF.
Citations. With Zotero open, type \ci in the paper (press \ then c then i, not in typing mode) and Zotero’s search box appears. Pick a paper and its citation, such as [@knuth1984], appears at the cursor. The reference list builds itself.
Grammar. Spelling and grammar suggestions appear as you write, from a checker called Harper that runs on your own computer.
6.5 Check every change
The review tab shows every line that has changed since you last saved a version, whether you changed it or the agent did. This is where you stay in charge: read what the agent wrote before you keep it.
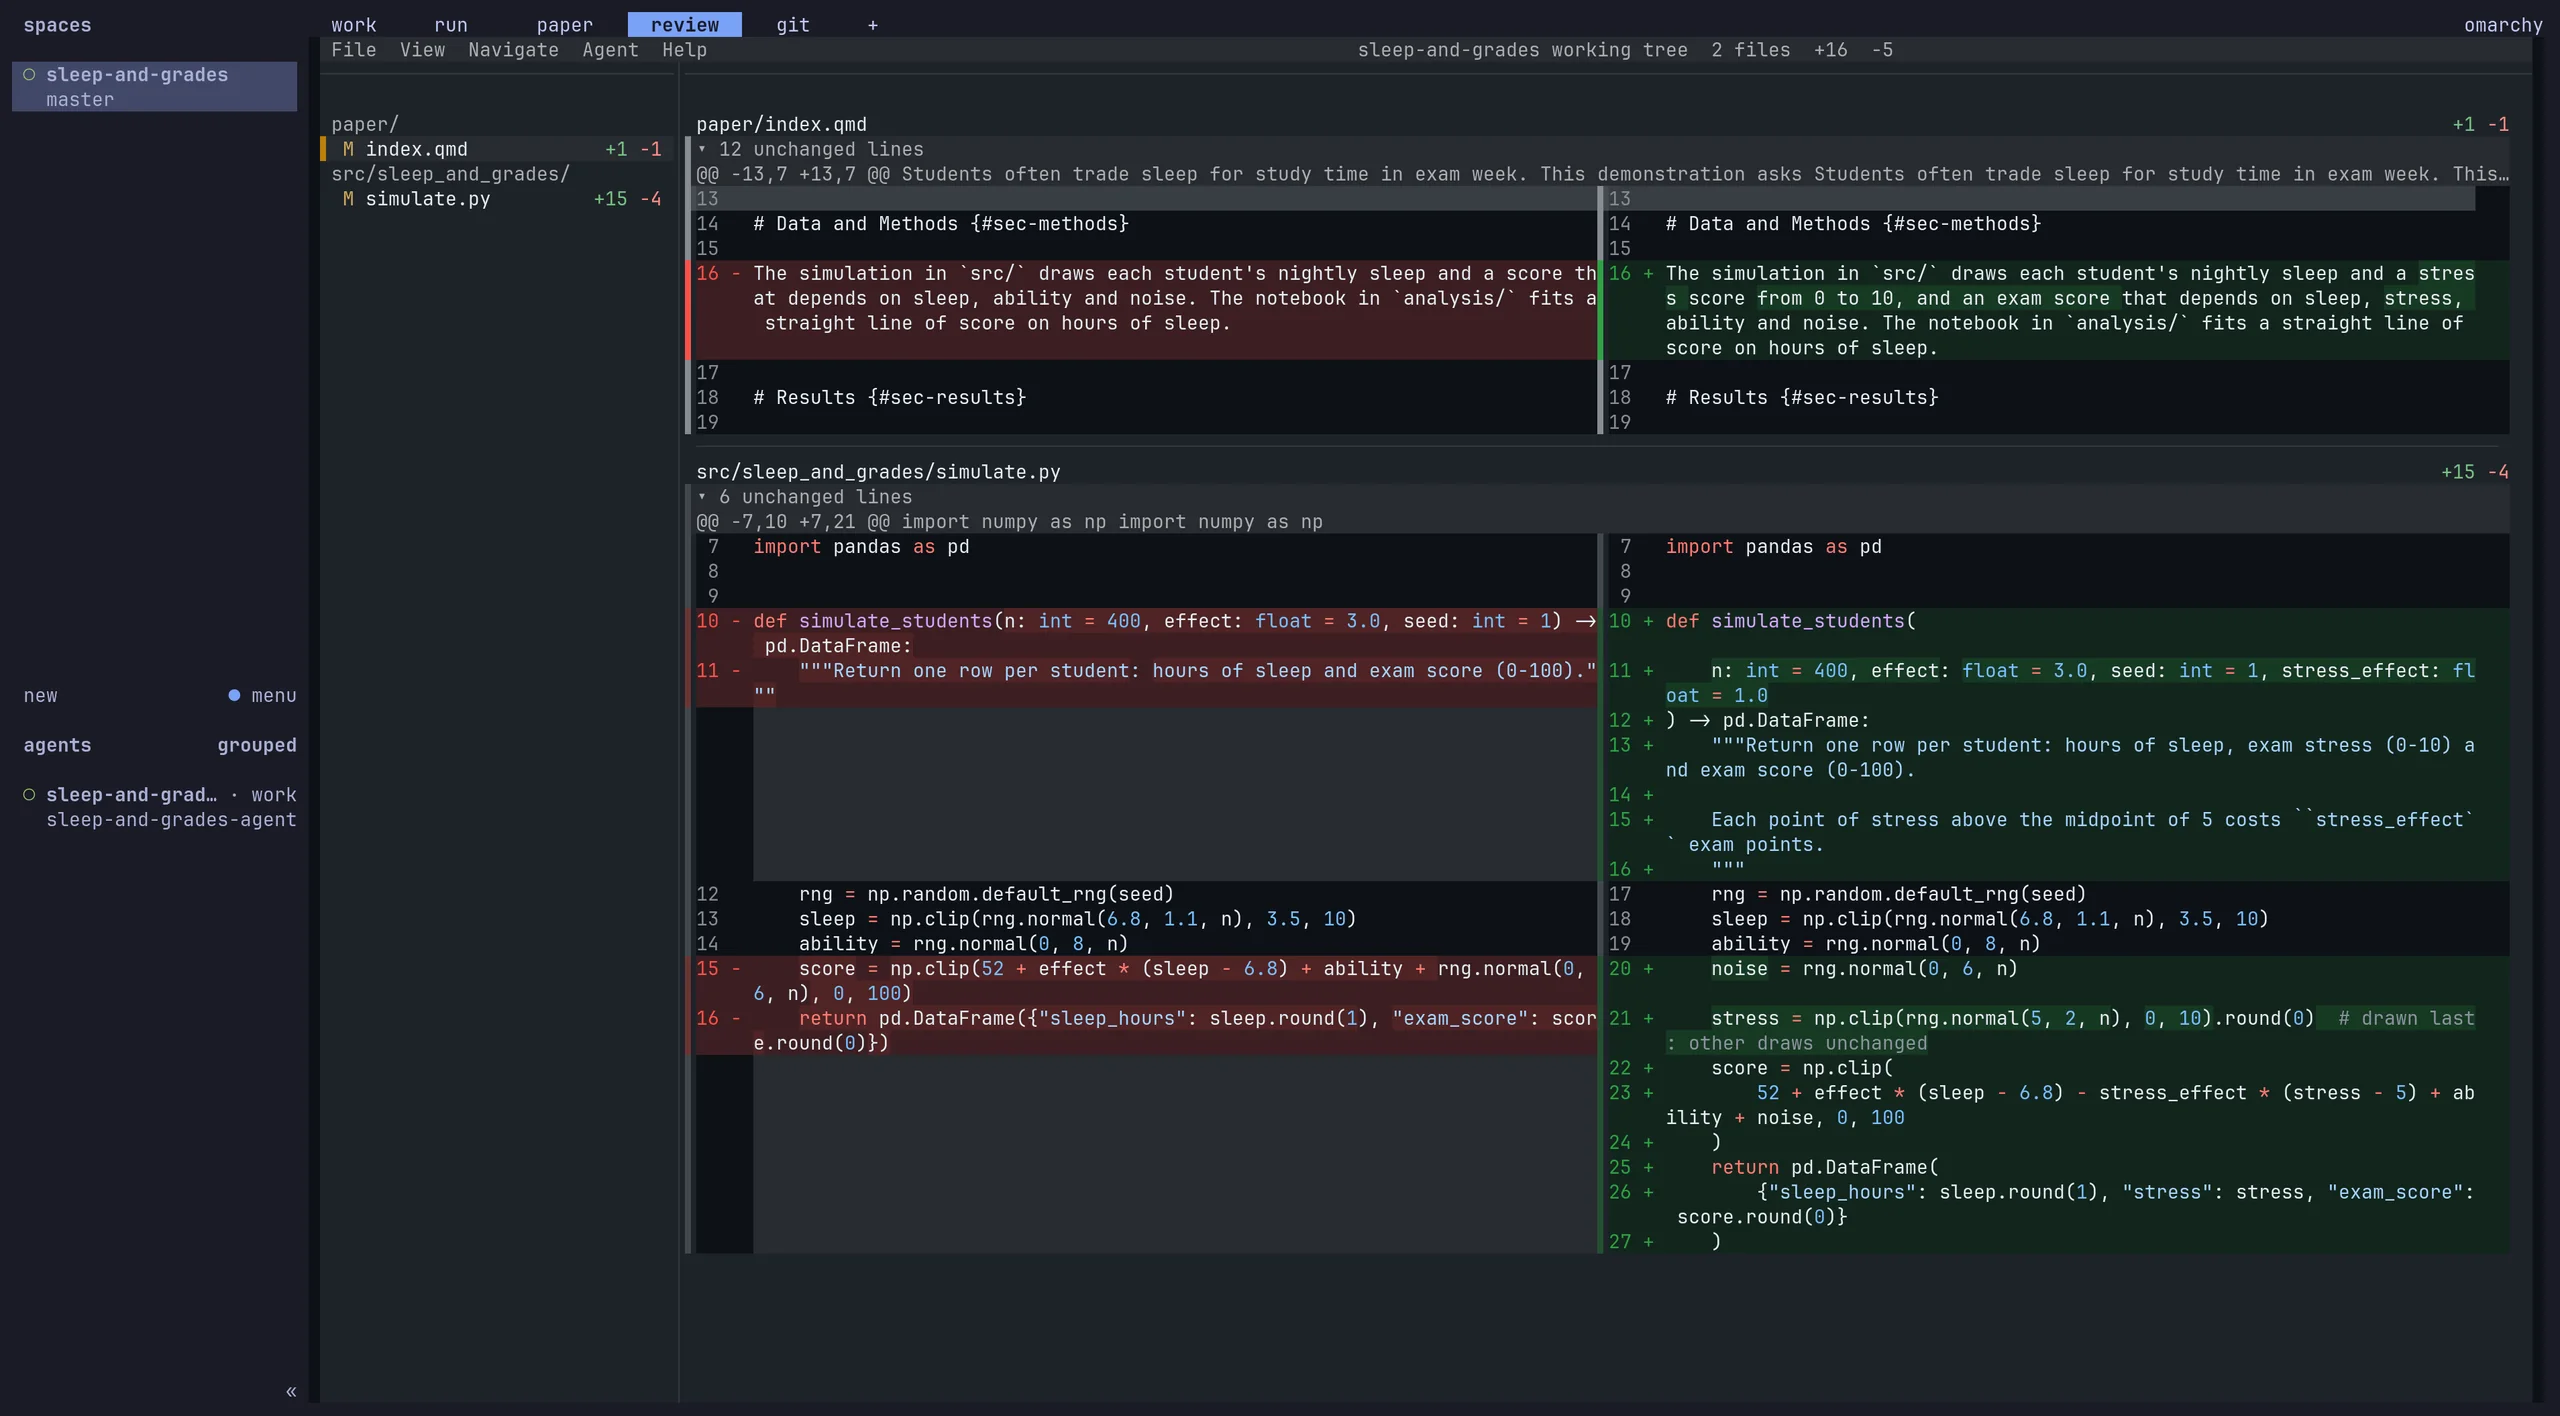 12345
- The review tab.
- Every file that has changed since your last saved version. Click one to jump to it.
- The old version, in red.
- The new version, in green. This is the agent’s Methods sentence.
- The agent’s change to the simulation, line by line. Read it here before you keep it.
6.6 Save a version and back it up
When the project is in a state worth keeping, save a version (a commit) in the git tab. You can also just ask the agent: “commit this with a short description”. The first time, ask it to “create a private GitHub repository for this project and push it”, and your work is backed up from then on.
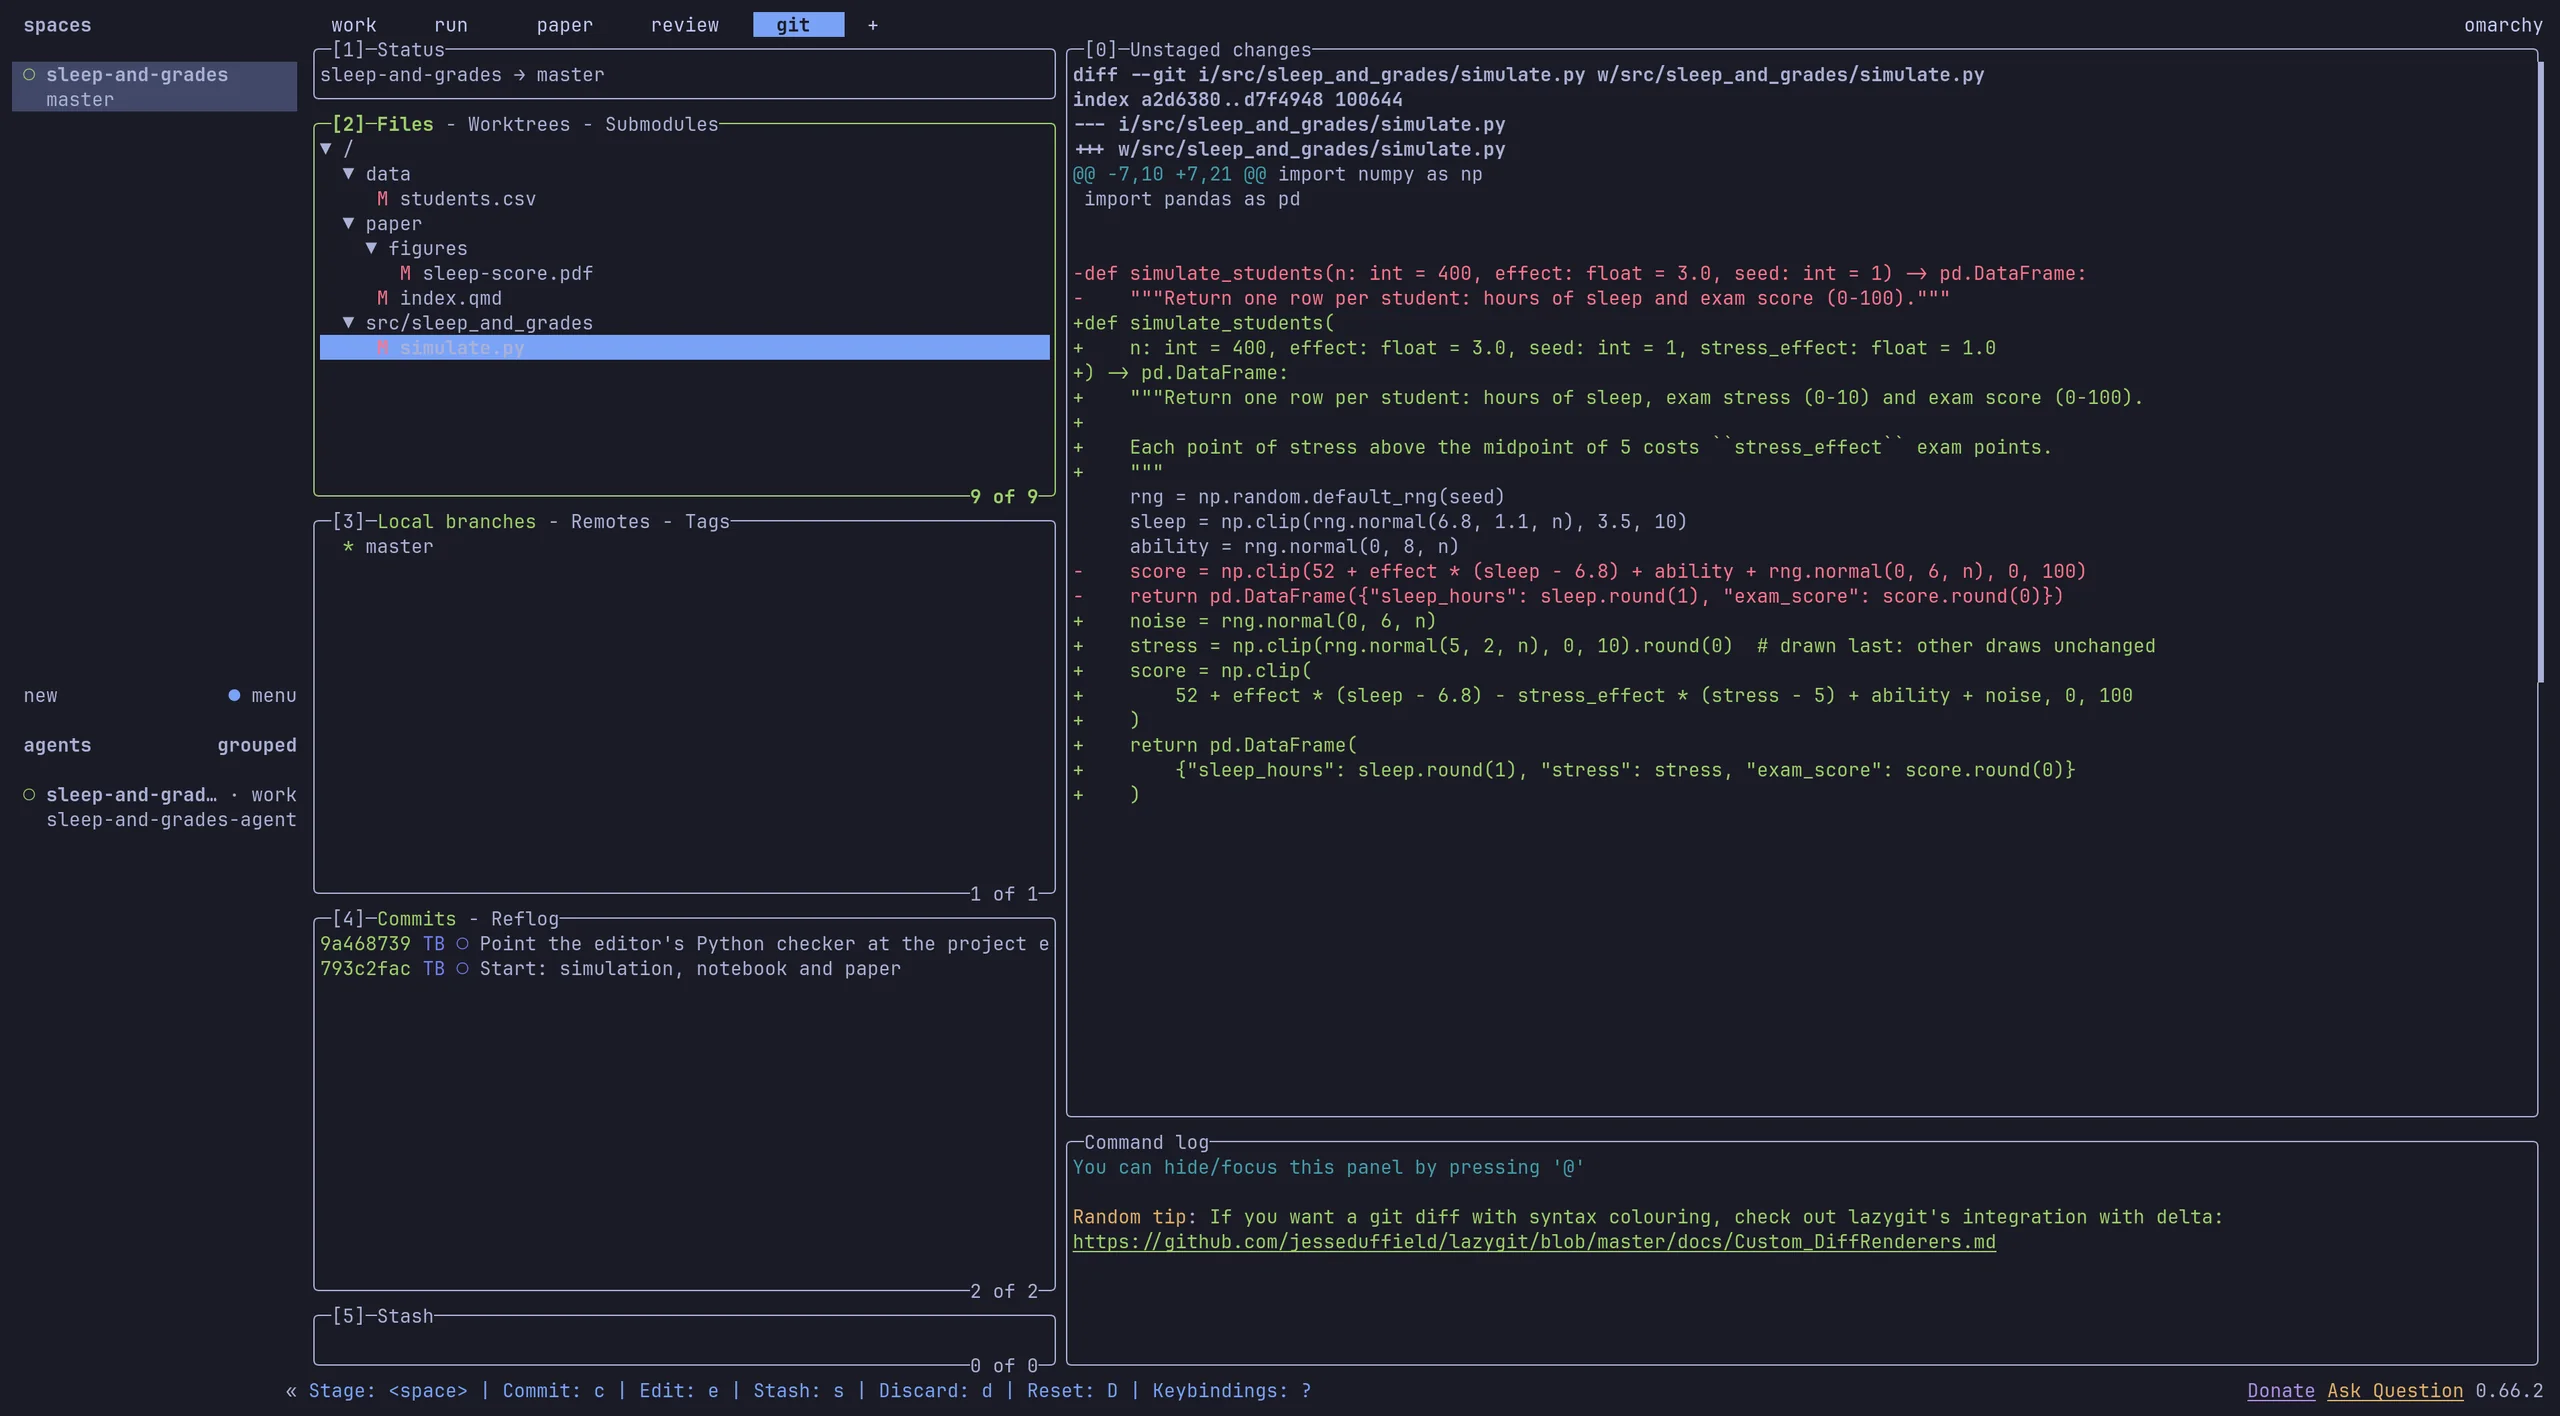 1234
- Changed files. Press Space on a file to include it in the next saved version, or a for all of them.
- Saved versions so far, newest first.
- What changed in the selected file.
- The keys for this screen are always listed along the bottom: c saves a version (a commit) and asks for a short description.
Round again
This is where keeping everything in one place pays off. Change the simulation, render the notebook, and the figure in the paper updates with it. Ask the agent to “check that the numbers in the Results section still match the analysis”, and it can, because it can see the code, the data and the paper together.
Coming back tomorrow
Open the Omarchy menu, choose Projects and pick your project. Everything comes back as you left it: the editor, the agent with your conversation, the console and the PDF builder. Even after you restart the computer, opening the project from the menu starts each tab’s program again.
Cheat sheet and help
| To | Do |
|---|---|
| Open the Omarchy menu | Super + Space (the Super key has the Windows or ⌘ logo) |
| Open an app | Super + Alt + Space |
| Open a terminal | Super + Enter |
| Close a window | Super + W |
| See every shortcut | Super + K |
| Start or open a project | Omarchy menu › Projects |
| Switch tabs in a project | Alt + 1 … 5, or click the tab |
| Open a file | Click it in the file list |
| Everyday editor actions | Right-click in the text |
| Type in the editor / stop typing | i to start typing, Esc to stop |
| Save the file | Esc, then type :w and press Enter |
| Find any editor shortcut | Press Space and wait |
When you’re stuck, ask your agent. It can read the error, explain it and usually fix it. Try “the PDF preview isn’t updating, can you find out why?” For Omarchy itself, the Omarchy manual and its Discord are friendly places to ask.